Showing posts with label cricut design space. Show all posts

Feb 14, 2023

Cricut's larger Print then Cut sizes for Explore & Maker users

 Cricut Print then Cut users - there is Good News!!

If you are using the latest Beta version of the Desktop (Computer version) of Beta Design Space v7.27.142, the Print then Cut limitations have increased.

But the limitations and paper sizes to as large as you can actually Print depends on the "Shape" of the printable project you are doing. 

For example on a 8.5 x 11 sheet of printable media that most of us can use in our Inkjet printers, the printable area limitation went from 6.75 x 9.25 inches to 7.44 x 9.94  - BUT you can't print a "rectangle" that size without getting an error message.   If you had a different shape of an image you might be able to fit it within that space, and print without an error message.

See this Angie Holden Video which shows the new size max limitations. 


While I can't print a Rectangle sized 7.44 x 9.94 inches 
on a Printable piece of media
that is 8.5 x 11, if I have a different shape I am able to print larger
Here is example

My own favorite printer to use most often, an HP Envy can't print Legal sized paper which is sized 8.5 x 14 and the printable area limitation is 7.44 x 12.94. But I do own a Canon Pixma TS9500 wide format printer that I can use, again I can't print a rectangle that size onto legal paper. 

If you do own a Wide Format printer, then you can also take advantage of the larger paper sizes available. 
Unfortunately most printable media currently available for Crafters is sized 8.5 x 11.  
I use the print then Cut feature with my Cricut Maker (and former Explore) the most of any feature. I am able to print onto Printable cardstock, Printable vinyl ( used for stickers), Printable Sticker paper, Printable Iron on transfer sheets, printable Magnet sheets, Printable Cotton sheets, Printable Glitter Cardstock. And except for Cardstock, and Photo Paper, most printable media still is sized 8.5 x 11.  So obtaining other sizes of the various types of Printable materials will be difficult and probably expensive. 

I am going to order some 11 x 17 cardstock to use with my Canon TS9500 printer, and perhaps some 8.5x17 printable sticker paper. 

I hope that Cricut will educate us on how to best fit the maximum amount of images within the new print then cut sizes.

Here is a good article online by Well Crafted Studio,  talking about the larger print then cut sizes (which currently are only available for computer users, using the Beta v7.27.142 version of Design Space.  iPad/iPhone users are still limited to 6.75 x 9.25 inches and 8.5 x 11 sizes of printable media) which provides a hack for using 12x12 cardstock. 


New Cricut Print and Cut Sizes
wellcraftedstudio.com/new-cricut-print-and-cut-sizes/

See too: Hey Lets Make Stuff article > Larger Print Then Cut Sizes

https://heyletsmakestuff.com/larger-cricut-print-then-cut-size/


See too this YouTube Video by Jennifer Maker

https://www.youtube.com/watch?v=pZf8-5WxImQ


Apr 27, 2022

How I download Bundle deals from sites like Design Bundles

This is how I do things when downloading Bundle deal files

For this example I am showing how I downloaded a Dec 2021 Free Bundle deal from DesignBundles.net (available for limited time, if reading this now in April 2022, this particular deal is gone)  designbundles.net/free-design-of-the-week


I created folders on my computers just for the websites I download from. This way I know where I obtained a file from and can give credit if needed to the source of the file.

So I have a 4 DesignBundles.net downloads folder and in that I sometimes create subfolders for collections

Once the Zip file is downloaded I extract it - unzip all the files


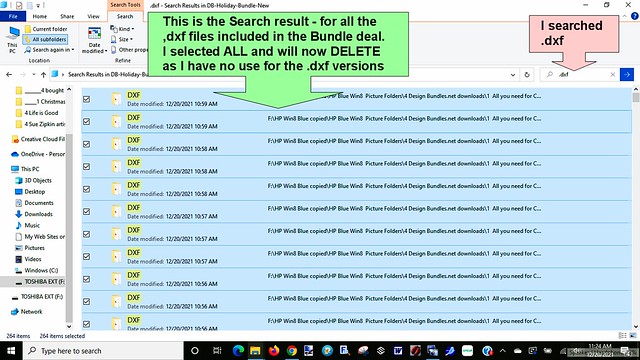
I only use Cutting files and Print then Cut files in my crafting projects - so I choose to only save the SVG (for Cut files to use with my Cricut machine) and the PNG and sometimes the JPGs (background papers if included are often in JPG format) and I might also keep the PDFs as they sometimes include instructions etc. ) - So once unzipped, I search for the file formats that I don't use - which include the .dxf, .eps, .ai  formats.  Now if you personally do use those formats, then certainly don't Delete them ;) .

So these screenshots show what "I" do and what I save from these Bundles of images


I download bundles or single zip files to Folders I create on my External Drive (I prefer downloading to a portable ext drive or a smaller zip/flash drive vs to my own Computer hard drive)  that are named for the websites I obtain them from.  So for example I have a 4 Design Bundles folder, a 4 Creative Fabrica Folder, a 4Hungry Jpeg folder etc.  For Etsy sites, I have a main 4 Etsy Purchases, and then inside that I create a folder named for the designers I purchase from.  I also buy lots of png image sets from the NitwitCollections.com website and I created a folder just for that site.  Because I keep the image sets and / or bundles in folders named for the websites I obtain them from, it is easy for me to give designer/website credit for them when I use them in a project with my Cricut machine.  

The biggest problem I have with some files, is after extracting the files, the images themselves may be poorly named, sometimes they are just numbered or not very descriptive. So its difficult to search through bundles.  I spend a lot of time, renaming files that I know I will be using. There are of course so many images in some bundles that I will never find a use for them.  Same thing with Fonts from Bundles, I install them, but certainly won't use all of them. So unless I know I am going to use them in the future - I don't bother to rename them. If I come across them at a later time, looking through my downloaded files, and want to use them in Cricut Design Space, I will rename them and upload them to Design Space with the new name.  When I upload an SVG or an Image like a PNG or JPG, I also add the Tags/Keywords in the description and name the website and also add other words that will help me find it at a later time, using the tag word and the filter of Uploaded.  So I would be able to search "Design Bundles" and filter by Uploaded to see all the files I have uploaded from just the Design Bundles website.   I have deleted whole folders from some Bundles, as I don't like the images and know I will never use them.  

I also try to download the example pics provided on the website of the file images if available or of a font sample pictures too.   I right click on the pictures from website and save to the folder I downloaded the Bundle to.    I can change the names on the pictures I download, to also help me for searching for them on my external drive at a later time. 

It is easy to be swayed by offerings of Free bundles or $1 bundles etc.  But try to limit yourself to deals that will really be used in your crafting.   And even if downloading to an external drive, or to a cloud drive, remember any drive can fail, so if its really important to you or irreplaceable, then back up to more than one spot.  

Note too: I use a Windows 10 computer, and have an SVG viewer extension on my computer, so that when I click on View of a Folder of SVG files, I can see the images as thumbnails - they show on my computer with the Microsoft Edge icon on them. But if you don't have a svg viewer, your SVG files may identify as Google Chrome or Microsoft Edge or Internet Explorer HTML documents, those are the SVGs that you would want to upload if using Cricut Design Space. If you have a Silhouette, you can use the DXF files for that machines software, I believe.   

See this Fields of Heather 2018 blog post for information about obtaining the SVG viewer extension for a Windows computer >> How to view thumbnails of SVGs

Free files available often from:  


Creative Fabrica >  Freebies of Fonts, Images and SVGs

Daily freebies & $1 deals > Daily Gifts and Dollar Deals  

Design Bundles  >  Free Design Resources

Font Bundles  > Free Fonts

The Hungry Jpeg  > TheHungryJpeg Freebies